2. Configure Automatic Client Configuration
Starting in Exchange
Server 2007, email clients were given the ability to automatically
configure their mail profiles. Before this time, the configuration of
Outlook and mobile devices was a manual process. To accomplish automatic
configuration, Exchange provides a service called AutoDiscover. The job
of AutoDiscover is to provide an XML file to the email client that
contains all the information it needs to connect to Exchange.
There are two ways that
clients connect to AutoDiscover. If the client is coming from the
internal network, it uses Active Directory to find the server it should
talk to in order to get the client configuration data. On the other
hand, if the client is coming from the Internet, it uses DNS to
determine which server to get the AutoDiscover data from.
AutoDiscover runs as an IIS
virtual directory on the Client Access server. The AutoDiscover virtual
directory is installed and configured by default when the Client Access
server is installed. Also, Active Directory is updated with the correct
AutoDiscover service location information when the CAS is installed.
2.1. Understand AutoDiscover for Outlook Anywhere
When clients access
email through Outlook Anywhere, AutoDiscover helps alleviate
configuration problems by configuring the Outlook client automatically.
To access the AutoDiscover service, the external user provides their
email address and password and the AutoDiscover server is found using
external DNS lookups.
Once the AutoDiscover server
is found, the client uses SSL to exchange information with the server.
To ensure that this is successful, your clients need to trust the
certificate authority that issued the SSL certification that your CAS is
using. Because of this requirement, you will not be able to use the
self-signed certificate issued by the CAS during install, unless the
client trusts the certificate.
2.2. Configure a DNS SRV Record for AutoDiscover
Outlook 2007 clients were
initially created with the ability to choose from predefined URLs when
discovering the AutoDiscover service. These early methods required some
additional planning and cost for organizations implementing
AutoDiscover. A later enhancement to Outlook allowed Outlook to query an
SRV locator record in DNS for the AutoDiscover service. If Outlook has
trouble obtaining information from the predefined URLs, it tries the SRV
record.
NOTE
A service locator (SRV)
record in DNS is a DNS entry that provides information about a network
service instead of a name or IP address resolution. The SRV record can
return information such as which host the service is running on, which
port it is listening on, and the weighting and priority of the servers
hosting the services.
To configure the SRV
record for AutoDiscover on a Windows-based DNS server, you will need to
use the DNS Manager tool. The SRV locator record should contain the
information shown in Table 1:
Table 1. SRV Record Information for AutoDiscover
| Setting | Value |
|---|
| Service | _autodiscover |
| Protocol | _tcp |
| Port Number | 443 |
| Hosts | External FQDNs that AutoDiscover provides |
To configure the SRV record on a Windows DNS server:
Open the DNS Manager tool by clicking Start => All Programs => Administrative Tools => DNS.
In
the Console tree, browse to the zone that represents the SMTP domain
name used in the email address. For example, if the email address is [email protected], you need to find the contoso.com forward lookup zone.
After you browse to the zone, click the Action menu in the DNS Manager snap-in and select New Other Records from the menu.
The Resource Record Type window will appear and allow you to define which type of record you want to create.
Scroll
down in the list and select Service Location (SRV) from the list of
available record types. Then click the Create Record button.
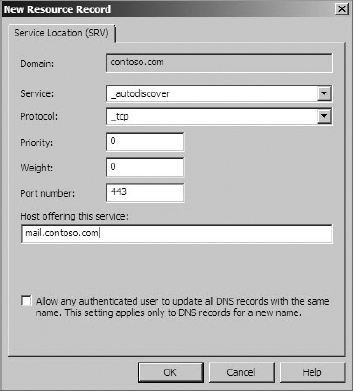
In the New Resource Record dialog, type _autodiscover
in the service field, _tcp
in the protocol field, and 443
in the port field.
In the field Host Offering This Service, type the name of the server that will provide AutoDiscover services, such as mail.contoso.com. Figure 1 shows how the DNS record should be configured.
Click OK to create the record. Then click Done when you are back in the Resource Record Type dialog box.
2.3. Test AutoDiscover Configuration in the Exchange Management Shell
The Exchange Management Shell provides a command that you can use to test the configuration of AutoDiscover. You can run the Test-OutlookWebServices
command to determine if any issues exist with AutoDiscover and report
what those issues are. To run the test, you must specify an email
address that AutoDiscover is run against.
The report that is generated by
the test is a line-by-line printout of the service information that
should have been received. The test will report successes and failures
and give you enough information to start troubleshooting AutoDiscover
issues. The following example demonstrates the use of the Test-OutlookWebServices command:
Test-OutlookWebServices [email protected]
3. Configure Access for Third-Party Clients
Exchange supports not only
Outlook clients, but also other third-party clients that use the POP3 or
IMAP4 protocols instead of MAPI. There are many reasons why MAPI would
be the preferred client solution, but many clients have limited options
and must use POP3 or IMAP4.
POP3 was designed to be an
offline email protocol. When you use POP3, the default configuration is
to download messages from the server to the client and remove the
messages from the server. This places the burden of managing and backing
up email on the end user.
IMAP4 is more robust than
POP3. IMAP4 was designed to access mail both online and offline. IMAP4
also has some additional advantages over POP3, such as the ability to
access public folders.
To allow clients to connect to Exchange using POP3 or IMAP4, you'll need to follow these high-level steps:
Turn on access for the user explicitly.
Ensure that users can access mail via one of the protocols.
3.1. Enable the POP3 and IMAP4 Service
The POP3 and IMAP4 services
are disabled by default in Exchange 2007. To turn them on, you need to
set the service to the Automatic state. You can do this in either the
Services MMC snap-in or the Exchange Management Shell.
To enable POP3 or IMAP4 using the Services MMC snap-in:
Open the Services snap-in by clicking Start => All Programs => Administrative Tools => Services.
In
the Services snap-in, select either the Microsoft Exchange IMAP4 or the
Microsoft Exchange POP3 service, depending on whether you want to
enable IMAP4 or POP3 connections.
Double-click
on the service to bring up its properties dialog box. In the Startup
Type section, change the setting to Automatic and then click OK.
Back in the list of services, right-click on the service and select the Start option from the menu.
To enable the service in the EMS, you can use the Set-Service command to configure the service, followed by the Start-Service command to start the service. The following EMS commands will enable the IMAP4 service:
Set-Service MSExchangeIMAP4 -StartupType automatic
Start-Service MSExchangeIMAP4
3.2. Turn On POP3 and IMAP4 for Users
After you have enabled the
POP3 or IMAP4 service, you need to allow users to access their mail
using those protocols. To enable POP3 or IMAP4 for individual users
using the EMC:
Open the EMC and browse to the Recipient Configuration => Mailbox node.
Select
the mailbox that you want to enable POP3 or IMAP4 access for and click
the Properties option in the Actions pane on the right.
In the properties dialog box for the mailbox, click the Mailbox Features tab.
In
the list of mailbox features, select either the POP3 or IMAP4 feature
and click the Enable button above the feature list. This will enable
access through this protocol.
Click OK to make the changes and close the properties dialog box.
To configure POP3 or IMAP4 access using the EMS, you can use the Set-CASMailbox command. For configuring POP3, use the PopEnabled parameter, and for IMAP4, use the ImapEnabled parameter. The following example turns on both POP3 and IMAP4 access for the John Smith mailbox:
Set-CASMailbox "John Smith" -PopEnabled $true
-ImapEnabled $true
3.3. Use Certificates with POP3 and IMAP4
You can use SSL with your
POP3 and IMAP4 deployment to make it more secure. By default, POP3 and
IMAP4 are installed using the self-signed certificate generated by
Exchange. If you want your users to be able to access email over POP3 or
IMAP4 from outside your organization using SSL, you need a certificate
issued by a certificate authority (CA) that is trusted by your clients.
Therefore, you should install a certificate obtained from a trusted CA.
You then need to modify the POP3 or IMAP4 parameter to tell it to use
the trusted certificate instead of the default self-signed certificate.
To modify the certificate used in the EMC:
Open the EMC and browse to the Server Configuration => Client Access node in the Console tree.
Click the POP3 And IMAP4 tab.
Select either POP3 or IMAP4 from the protocol list and click the Properties option in the Actions pane.
In the properties dialog box, click on the Authentication tab.
In the field X.509 Certificate Name, enter the subject name of the certificate—for example, mail.contoso.com.
Click OK to make the changes and close the properties dialog box.
To set the certificate name using the EMS, you will use either the Set-PopSettings command or the Set-ImapSettings command. Specify the x509CertificateName parameter followed by the subject name of the certificate. The following example sets the IMAP4 certificate for Contoso:
Set-ImapSettings -x509CertificateName mail.contoso.com